Refraction of Light
Senior 3 · Physics
Refraction of Light
Lesson 3 of 5
30 min
Stand at the back of a classroom, facing a sunny window. Hold a magnifying glass between the window and a sheet of white paper, and slowly move the paper back and forth. At one distance a sharp, bright picture of the window appears on the paper, with the trees and sky outside it, all upside down. One curved piece of glass has made a picture you can catch on a screen. A camera, a projector and your own eye all work this way. This lesson explains how, by drawing the paths of a few rays.
Definition
Lens: a piece of transparent material with at least one curved surface, which refracts light to form an image.
Converging (convex) lens: a lens that is thicker in the middle than at the edges; it bends parallel rays towards each other. Diverging (concave) lens: a lens that is thinner in the middle; it spreads parallel rays apart.
The focus of a converging lens is real: light really passes through it, and you could catch a bright spot there on paper. The focus of a diverging lens is virtual: the rays only seem to come from it.
Definition
Principal focus (F): the point to which rays parallel to the principal axis converge after passing through a converging lens, or from which they appear to diverge after passing through a diverging lens.
Focal length : the distance between the optical centre and the principal focus. Example: a magnifying glass with .
Real image: an image formed where rays actually meet; it can be caught on a screen. Virtual image: an image from which rays only appear to come; it cannot be caught on a screen.
Repeat the window experiment with a metre rule. When the picture of a distant tree or building is sharpest, measure the distance from the lens to the paper. Light from a very distant object arrives almost parallel, so it is focused at F, and this distance is the focal length. For a lens with , an object 5 m away gives a sharp image at 10.2 cm, so the estimate is within about 2%.
Warning
Safety: the Sun and lenses
Light from the tip of an object spreads out in all directions, but three rays have paths you can predict without measuring any angles. For a ray diagram, the lens is drawn as a vertical line on the principal axis, with arrowheads pointing out for converging and in for diverging.
| Ray from the tip of the object | Converging lens | Diverging lens |
|---|---|---|
| 1. Parallel to the principal axis | Passes through F on the far side | Spreads out as if it came from F on the near side |
| 2. Through the optical centre O | Goes straight on | Goes straight on |
| 3. Through F on the near side (converging), or heading for F on the far side (diverging) | Comes out parallel to the axis | Comes out parallel to the axis |
Two rays are enough to locate the image; the third is a check. Where the rays meet after the lens, the image is real. If they spread out after the lens, extend them backwards with dashed lines: where the dashed lines meet is a virtual image.
Each diagram below was drawn to scale from the lens equation of lesson 4, so the rays really do meet where the image is shown. Ray 1 is red, ray 2 green and ray 3 blue.
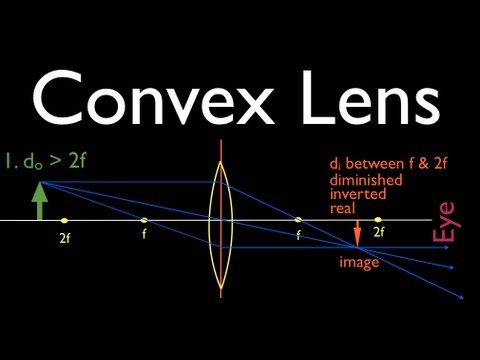
The image is real, inverted, diminished, and lies between F and 2F on the other side. A camera lens and the lens of your eye form images like this on the sensor or the retina.
The image is real, inverted, magnified, and lies beyond 2F. A projector puts a small, brightly lit slide just outside F, upside down, so that a large upright picture appears on a distant screen.
The rays spread out after the lens and never meet. Your eye traces them back to a virtual, upright, magnified image on the same side as the object. This is how a magnifying glass works: hold it so that the object is closer than one focal length.
Wherever the object is, a diverging lens gives a virtual, upright, diminished image between F and the lens, on the same side as the object. The lenses in spectacles for short sight and the wide-angle viewer in some doors are diverging.

| Object position (converging lens) | Image position | Nature of image | Use |
|---|---|---|---|
| Very far away | At F | Real, inverted, very small | Finding ; telescope objective |
| Beyond 2F | Between F and 2F | Real, inverted, diminished | Camera, eye |
| At 2F | At 2F | Real, inverted, same size | Same-size copying |
| Between F and 2F | Beyond 2F | Real, inverted, magnified | Projector |
| At F | No image (rays leave parallel) | None | Lamp at F gives a parallel beam |
| Between F and lens | Same side as object | Virtual, upright, magnified | Magnifying glass |
Worked example 1: a scale drawing
An object 4.0 cm tall stands 30 cm from a converging lens of focal length 10 cm. Find the position, size and nature of the image by a scale drawing.
Scale: 1 cm on paper represents 5 cm. So the object is 6.0 cm from the lens on paper and 0.8 cm tall, and F is 2.0 cm from the lens. Draw ray 1 (parallel, then through F on the far side) and ray 2 (straight through O). They cross 3.0 cm beyond the lens, 0.4 cm below the axis.
Converting back: the image is from the lens and tall. It is real, inverted and diminished. Since the object is beyond 2F (20 cm), this matches the table.
Worked example 2: a magnifying glass
A stamp 1.0 cm tall is 3.0 cm from a magnifying glass of focal length 5.0 cm. Where is the image, and how tall is it?
The object is between F and the lens, so the image will be virtual. A full-size drawing shows ray 1 and ray 2 spreading out after the lens; their dashed backward extensions meet 7.5 cm from the lens, on the same side as the stamp, 2.5 cm above the axis. The image is virtual, upright and 2.5 cm tall: the stamp looks two and a half times larger.
Warning
Common mistakes in ray diagrams
Tip
The "inside F" switch. For a converging lens, everything changes at F. Outside F, the image is real and upside down, on the other side. Inside F, it is virtual and upright, on the same side. Then 2F decides the size: object beyond 2F gives a smaller image, between F and 2F a larger one.
Ray Diagrams (2 of 4): Convex Lens (Step by Step Science). Watch the two rules for rays used at each object position, and how the image changes as the object moves towards the lens.
Practice
Key points
Sources and credits
Written by Ganzaa: the lesson text, the five diagrams (drawn to scale from the lens equation), the tables, worked examples and practice exercises.