Arduino Development
Senior 6 · ICT
Arduino Development
Lesson 1 of 5
22 min
A milk collection centre must keep milk below 4 °C, but nobody can watch the thermometer all night. A small electronic board with a temperature sensor can: it checks the cold room every minute, and if the temperature rises it sounds a buzzer and sends a message to the manager's phone. Devices like this, which sense the physical world, decide something and act or report over a network, make up the Internet of Things. In this unit you will build them with the Arduino, a small, cheap and well-documented board, first in a simulator and, if your school has the parts, on a real bench.
Definition
Internet of Things (IoT): physical objects fitted with sensors, processors, software and network connections so that they can collect data and exchange it with other devices or services over the internet.
Sensor: a device that measures a physical quantity (temperature, light, distance, motion) and turns it into an electrical signal. Actuator: a device that turns an electrical signal into action (light, sound, movement).
Microcontroller: a small computer on one chip, with a processor, memory and input/output pins, made to control one device. Example: the ATmega328P on the Arduino Uno.
| Layer | Job | Examples of parts |
|---|---|---|
| Things (perception) | Sense the world and act on it | Temperature, light, distance and motion sensors; LEDs, buzzers, motors, relays |
| Processing (edge) | Read sensors, decide, drive actuators | Arduino Uno, ESP32, Raspberry Pi Pico |
| Connectivity | Carry data to and from the internet | Wi-Fi, Bluetooth, LoRaWAN (long range, low power), mobile data |
| Cloud and application | Store, analyse and display data; send alerts and commands | A database, a web dashboard, an SMS or phone notification |
| Microcontroller board (Arduino Uno R3) | Laptop computer | |
|---|---|---|
| Processor speed | 16 MHz, 8-bit | Several GHz, 64-bit, many cores |
| Memory | 32 KB flash for the program, 2 KB SRAM | Gigabytes of RAM and storage |
| Operating system | None: runs one program, forever, from power-on | Windows, macOS or Linux running many programs |
| Connects to | Sensors and actuators directly, through pins | Keyboard, screen, network; not to bare sensors |
| Power | Well under 1 W; can run on batteries | Tens of watts |
For reading a sensor and switching a pump, a microcontroller is cheaper, more reliable and uses far less power than a computer.
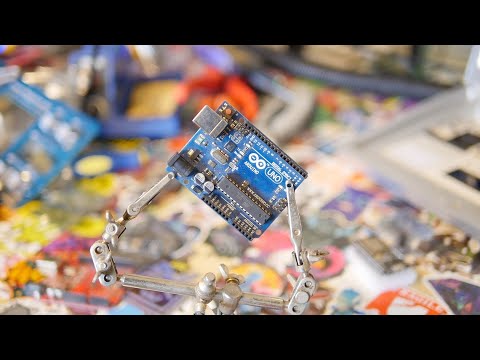
Arduino is an open-source platform of boards and software, started in 2005 at the Interaction Design Institute Ivrea in Italy to give design students a cheap, simple way to build interactive projects. Its board designs are published, so many compatible boards exist; its programming tool, the Arduino IDE, is free. The most widely taught board is the Arduino Uno.

| Part | Arduino Uno R3 |
|---|---|
| Microcontroller | ATmega328P, 16 MHz |
| Operating voltage | 5 V (a 3.3 V supply pin is also provided) |
| Power | USB (5 V), or 7 to 12 V through the DC jack or the Vin pin |
| Digital input/output pins | 14 (0 to 13); 6 of them (3, 5, 6, 9, 10, 11) can produce PWM, marked ~ |
| Analog input pins | 6 (A0 to A5), read by a 10-bit analog-to-digital converter |
| Current per input/output pin | 20 mA recommended (40 mA absolute maximum) |
| Memory | 32 KB flash (0.5 KB used by the bootloader), 2 KB SRAM, 1 KB EEPROM |
| Built-in LED | Marked L, connected to pin 13 |
Pins 0 and 1 carry serial data to the computer over USB (RX and TX), so leave them free while uploading and using the Serial Monitor. A newer board, the Uno R4 (2023), keeps the same pin layout but uses a 32-bit Renesas RA4M1 processor at 48 MHz with much more memory; the R4 WiFi version adds Wi-Fi and Bluetooth.
Two free, browser-based simulators let you wire an Uno, write the program and watch it run, with no hardware and no risk of damage:
tinkercad.com): drag an Uno, a breadboard and parts onto a workbench, wire them, and write code in blocks or text.wokwi.com): text-based Arduino projects with many sensors, a Serial Monitor and shareable links.The unit's key competence is to build a simulated IoT system; every circuit in the following lessons can be built in either simulator.
MakeUseOf: What Is Arduino? What Can You Do With It? Explained. Watch for the difference between a microcontroller board and a computer, and the kinds of project it shows; compare them with the IoT layers above.
Worked example 1: name the layers
A cooperative wants to know when its maize store becomes too damp. A humidity sensor in the store is read every 10 minutes by an ESP32 board, which sends the reading over Wi-Fi to an online database; the manager sees a graph on her phone and gets an SMS when humidity passes 70%; a fan switches on automatically.
Worked example 2: is one Uno enough?
A smart-gate project needs: an ultrasonic distance sensor (2 digital pins), a servo motor for the barrier (1 PWM pin), a red and a green LED (2 digital pins), a buzzer (1 digital pin) and a light sensor (1 analog pin). Check the pins and the LED current.
One Uno is enough, with room for two more sensors.
Warning
Protect the board and yourself. Never connect the 5 V pin directly to GND (a short circuit). Never draw more than 20 mA from a signal pin: always put a resistor in series with an LED, and never connect a motor or a relay coil straight to a pin. Disconnect the USB cable before changing the wiring. Never connect any part of the board to mains electricity.
Tip
Read the pin, not the picture. Before every connection, find the label printed beside the pin on the board, such as ~9 or A0. Most wiring faults come from being one pin out.
Check: you can point to every pin listed in step 2 without looking at the labels on the map, and your IoT drawing names a part in every layer.
Practice
Sources and credits
This lesson adapts CC BY-SA material and is shared under CC BY-SA 4.0.