Tie and Dye a Fabric
Senior 3 · Fine Arts
Tie and Dye a Fabric
Lesson 3 of 4
25 min
An experienced dyer can look at a tied bundle and tell you what the cloth will look like when it is opened: how many rings, which way the stripes will run, where the white will be. That is not magic but geometry. Every fold, twist and binding leaves a predictable mark. In this lesson you will learn the main ways of folding and binding cloth, and the rules that let you predict the pattern before the dye goes on.
Definition
Binding: the material wrapped round the cloth to make a resist, such as rubber bands, string or raffia.
Pleat: a fold of cloth doubled back on itself; accordion folding pleats the cloth back and forth like a paper fan.
Line of symmetry (mirror line): a line across which one half of a pattern mirrors the other. In tie-dye, fold lines become lines of symmetry.
Tritik: stitch resist; a running stitch is sewn along a line, pulled tight and knotted before dyeing.
Itajime: shape resist; folded cloth is clamped between two shapes, such as wooden blocks or bottle caps.
| Material | Effect | Notes |
|---|---|---|
| Rubber bands | clean, sharp pale lines | quick and tight; reusable |
| Cotton string or strong thread | fine lines; can be wound in wide bands for broad white areas | also used for tritik stitching |
| Raffia or sisal | slightly irregular lines with soft edges | local, traditional (used in adire oniko) |
| Stones, seeds or bottle caps tied in | circles and rings | tie the cloth round the object, then bind below it |
| Clamped blocks or caps (itajime) | repeated geometric shapes | clamp with string or clothes pegs |
| Plastic wrapped and tied over an area | a large area kept completely undyed | useful for keeping a space for lettering or a motif |
Worked example 1: a bullseye on a T-shirt
Ishimwe pulls the centre of a T-shirt up into a cone 30 cm long and binds it 6 cm, 12 cm, 18 cm and 24 cm from the tip. Predict the pattern.
Bindings: 4, so there will be 4 pale rings.
Dyed bands: the cloth between and outside the bindings takes dye: the tip (0–6 cm), three bands between bindings, and the rest beyond 24 cm, so 5 coloured areas, the first a central dot.
Spacing: bindings 6 cm apart along the cone give rings roughly 6 cm apart on the cloth, measured outward from the centre point.
Worked example 2: how many circles?
Gatete folds a square cloth in half three times, so it is 8 layers thick, then ties one stone into the folded bundle, away from any corner or fold. How many circles will appear when it is opened, and why?
Layers: each fold doubles the layers: .
Circles: the tie passes through all 8 layers, so 8 circles appear, mirrored across each fold line.
If the stone were tied exactly at the folded corner where the folds meet, the circles would join into fewer, larger shapes, so place ties carefully.
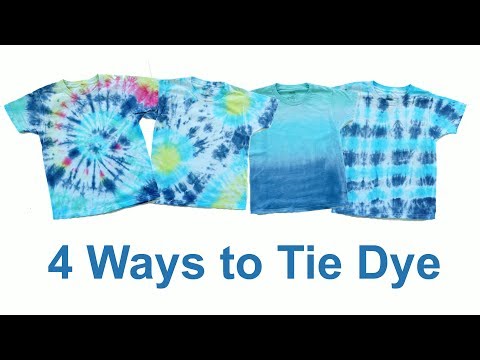
<em>4 Ways to Tie Dye: Bullseye, Swirl, Stripe and Ombre</em>, from Mr. Otter Art Studio. Before each result is revealed, pause the video and predict the pattern using the rules in this lesson.
Warning
Bindings too loose let dye creep under and the pattern disappears; test tightness by trying to slide the band along the cloth.
Cutting bindings. Cut rubber bands and string with blunt-ended scissors, pulling the binding away from the cloth so you do not cut the fabric or your fingers.
Tip
Tight = white, folds = mirrors, layers = repeats. Sketch your prediction before you dye, then compare.
Practice
Which technique gives concentric rings, and how is the cloth prepared?
How should you pleat cloth to get diagonal stripes?
A bullseye cone is bound at 5 places. How many pale rings will there be?
A cloth is folded in half twice and one bottle cap is clamped into it, away from the folds. How many circle shapes will appear?
Name two binding materials and the different effect each gives.
After dyeing a crumpled bundle, Ineza found almost no white. Analyse what probably went wrong, and how to fix it next time.
Sample task. Make four small samples (about 20 cm square) using spiral, bullseye, accordion and crumple. Before dyeing, sketch your prediction for each; after dyeing, compare and write one sentence on any difference.
1. Bullseye: pinch a point, pull it up into a cone and bind tightly at intervals.
2. Fold the pleats at 45° to the edge of the cloth (diagonally), then bind.
3. 5 pale rings, one for each binding.
4. Folded in half twice gives layers, so 4 circle shapes.
5. For example: rubber bands give clean, sharp pale lines; raffia gives irregular lines with soft edges; a tied stone gives a circle.
6. The bundle was probably too loose, or too much dye was applied, so dye soaked into the hidden folds. Next time scrunch the cloth more tightly, bind it firmly in two directions, and apply less dye to the surface only.
7. Check: four samples, four sketched predictions, and a comparison sentence for each.
Which of your predictions was most accurate, and which surprised you? What will you change about your folding or binding for the final piece?
Sources and credits